Summary
AiroCollect works as follows:
- You fly with a drone over the area you want to scan (5-10 min).
- You upload the pictures into collect.airobot.eu.
- After processing, you get an e-mail (30 min average)
- Go and take all measurements/exports you need
Below you will find detailed instructions how to start, use the software including management of your subscription and payment.
The objective is to get you to maximise your profit with AiroCollect.
Demo
The roof demo video explains the potential performance of AiroCollect for roofers and shows how it helps in making quotations for your customers.
The solar demonstration explains the potential performance of AiroCollect to simulate solar projects and hereby create an offer for your customers.
The quotation demo explains the potential performance of AiroCollect create project offerings at your clients.
The quotation demo explains the potential performance of AiroCollect create project offerings at your clients.
Introduction
AiroCollect is a cloud based application:
- The software is accessible everywhere there is internet
- We store all for you, no more save buttons
- You always have the latest version, no more updates
The only thing you need to do is setup your drone and go fly to take all measurements needed.
System setup
Get airborne
Fly
AiroCollect works with any drone that takes images with GPS position:
- You fly with your drone over the object you want to digitize.
- While flying over, you let the drone take images.
- Each image should have at least 70% of the previous image on it.
- Each image should have some of the environmental context on it.
- On average a scans vary between 50 and 250 images
- For large terrain scans the system can handle up to 1.500 images
Below you will find some explanation on how you need to fly and start assembling your model.
Measure
AiroCollect has many measurement options:
2D tools
- distance
- surface
- images
- circles
- notes
- texture
- compare
3D tools
- distance
- area
- height
- corners
- notes
- volumes
- height profiles
- reference points
Solar tools
- 2D & 3D panels
- azimuth
- vertical panel angle
- total installation power
- portrait - landscape
- orientation (N-S, E-W)
- auto panel spacing
- autofill surface
- infill obstacle detection
Accuracy
Our software is very flexible about which drone you use and it is also exceptionally accurate. On average the scale is 99% accurate. Proven to be more than sufficient for quotations, work preparation and invoicing.
If verified true accuracy is wanted, one can scale to an exact measurement taken or use a self defined reference plane. Use of an RTK corrected drone provides for the same. With one of those mitigations, data is additionally useful for accurate design and land registry.
Precision
Whether measuring volumes, surfaces, distances or elevation, Airocollect delivers measurements with precision down to the centimeter, allowing you to use geographic points easily and accurately.
Measurements can be taken in metric or imperial.
Classification
Classifications contain a self defined label and color to help in summation of measurements taken.
- Roofers get an immediate overview of total surface area of tiles, scaffolding or total distance of ridges and gutters and much more.
- Gardeners get the total surface area from for example grass or pavement, total volume of soil to displace or bushes to remove or total number of sprinklers to install,…
- Generically you can use them to get periodic inventory on stock piles or all other different type of aggregated measurements.
In total 30 self defined classifications can be configured.
Use the software
Workspace
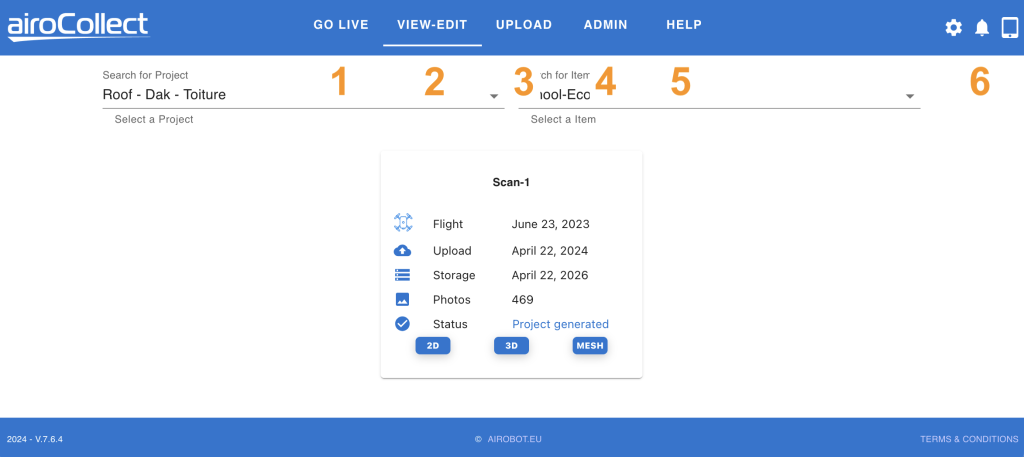
1. Go Live
Functions to command the drone from the office.
2. View - Edit
Visualize your scanned projects
- Select the project by clicking on the arrow or typing in part of a project name.
- Select the item by clicking on the arrow or typing in part of an item name.
- Choose the scan you want to work in.
3. Upload
- Select the project and item you want to upload a project in.
– If the project and item are non existent, click the + button.
– Once the + button is clicked, validate with the v or cancel with xIf you worked in the same area, upload under the same project and item! This will allow to compare models and have roof and facade measurements at the same location.
Click NEXT to continue.
- Choose the type of scan you did for the optimal working of the algorithm.
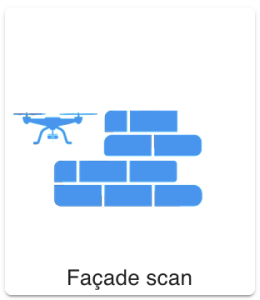
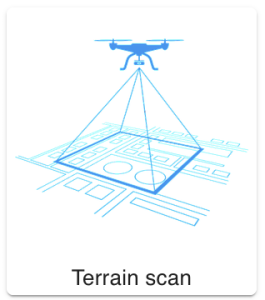
– With TERRAIN you will an orthophoto 2D (satellite image)
Now choose a name for the scan you are about to make and press next.
– With TERRAIN you get a 3D pointcloud & mesh (photorealistic 3D)
– With FACADE you will get a 3D pointcloud & mesh - Press add more files to open up a file finder or drag and drop the images taken by the drone into this window.
– For fast operation, copy the images first from your drone to your pc.
– Only select images from a single area and similar time.
– Exclude images on the ground.
– Only include images with air on them in “Façade” scans
The software will check if images comply with some of the best practices to generate a usable model. For some rules the upload will block, for others you will get a warning that the result by vary.
If an image does not comply, you should remove them from the list. - The final step displays the coordinate system in which your images will be processed. This is important if you want to do a rectification step by adding ground control points or have images taken with RTK GPS position.
4. Admin
- Company
– Add company logo for report.
– Add company details for report. - Users
– Manage users, menu and data access. - Projects
– Edit name and project details. - Datasets
– Overview and delete option for scans. - WMS
– Add and edit multiple potential different backgrounds for 2D.
– Ex. Land Registry, elevation models, demographic data. - Coordinate system
– Define default coordinate systems for GPS and RTK-GPS flights
– Define default coordinate system for exports
– Metric & Imperial switch - Classifications
– Edit the color aggregates by which measurements are categorized. - Licenses
– See in which program you are and how many scans you have left. - Drones
– See which drones you cannot to the AiroLive functionality.
5. Help
Link towards this page.
6. Modes
- Language
- Dark Mode
- Change Password
- Log Out
- Notifications
- Tablet/Desktop Mode
2D Environment
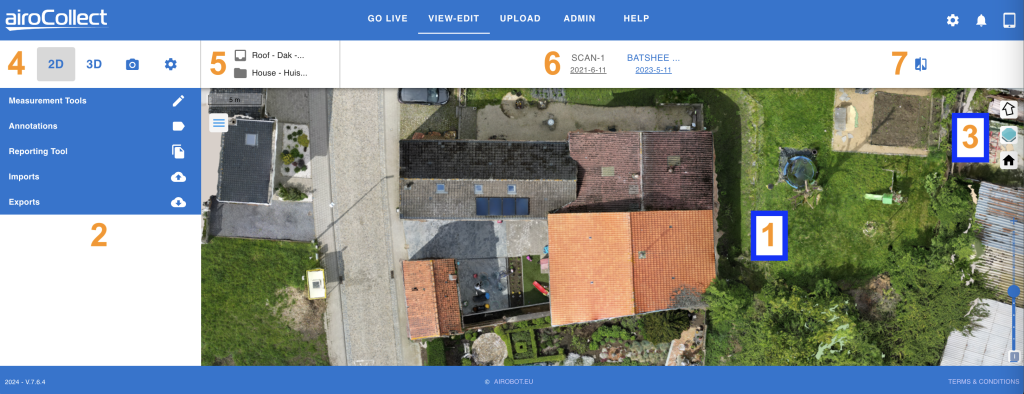
1. Ortho Navigation
(works also during measuring)
Translate (move up, down, left right)
1. Click & Hold left mouse button
2. Drag the mouse pointer over the screen
3. Release to keep current position
Rotate (yaw the image to a new horizontal position)
1. Keyboard press SHIFT and hold
2. Click + Hold left mouse button
3. Drag the mouse pointer over the screen to rotate
4. Release to keep current position
Zoom (enlarge or minify what you see)
1. Use mouse scroll up to zoom in
2. Use mouse scroll down to zoom out
2. Tools
There are multiple tools you can use in order to get useful information from the ortho photo. These are explained later:
- Measurement Tools: Take measurements
- Anotations: Show measurements taken
- Generate a PDF report
- Import a CAD file
- Export CAD file, ortho photo (with coordinates), DEM
3. Map
Home Point (go back to initial position)
1. Click the house icon
Layers (visualize different backgrounds)
1. Publicly hosted WMS layers
2. Privately hosted WMS layers
3. Black background
4. White background
North Arrow (for solar)
1. Click to point North Up
4. Mode
Dataset Selection
2D Environment
– View Ortho, Satellite image
3D Environment
– View the model in 3D
Images
– Review all uploaded images
Settings
– Here you can find the references of the scan
– Here you can find the links to the model to be shared online.
5. Name
a) Project Name
b) Item Name
6. Scans
Select and visualize the different scans made under this project and item.
7. Compare
It is possible to compare different ortho photo’s with each other.
You select how you want to use the comparison system:
– Compare 2 datasets with eachother
– Compare a dataset with a WMS layer (Ex. Land Registry)
This is ideal to do project follow up or land registry comparison.
2D Measurements
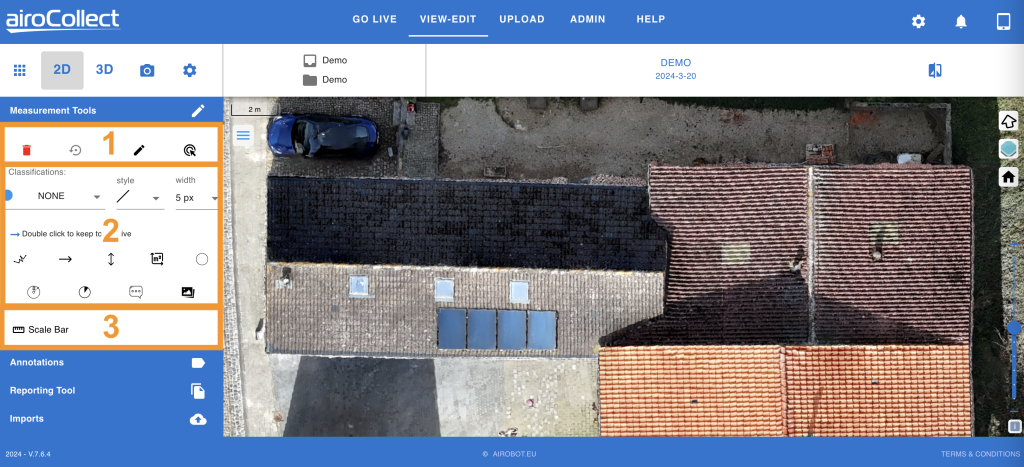
1. Screen State
Reset
Click left and validate to start over
Undo
Click left to reset last measurement taken
Edit
Put the screen in edit mode whereby you can go in the ortho photo and modify placed measurements
Delete
Activate a delete mode, clicking left on a measurement will delete it.
2. Measurement Tools
Choose a classification
1. Click left and select a label and color for the measurement you are going to take.
Names and colors can be edited under the “admin” section
Measurements taken under a classification will be grouped for edit and reporting aftwerwards.
Activate a measurement tool
1. Select the tool you want to use.
– Click left once to use the tool once
– Click left twice to use the tool continuously
Move over the ortho photo to start the measurement.
1. Based upon the classification chosen you have a colored dot connected to the mouse pointer.
2. Click left once to start a measurement.
3. Click left again for an intermediary point, if needed.
4. Click left twice to finish the measurement.
Your measurements can be found back under annotations below the classification chosen.
3. Scale Bar
Add a reference measurement to the model
1. Click left to activate reference measurement placing.
2. Place a reference measurement on the ortho photo, 1 Click left to start, 2 Clicks left to end
3. Change the value to the desired value
4. All other measurements well be rectified with the reference measurement taken.
2D Annotations
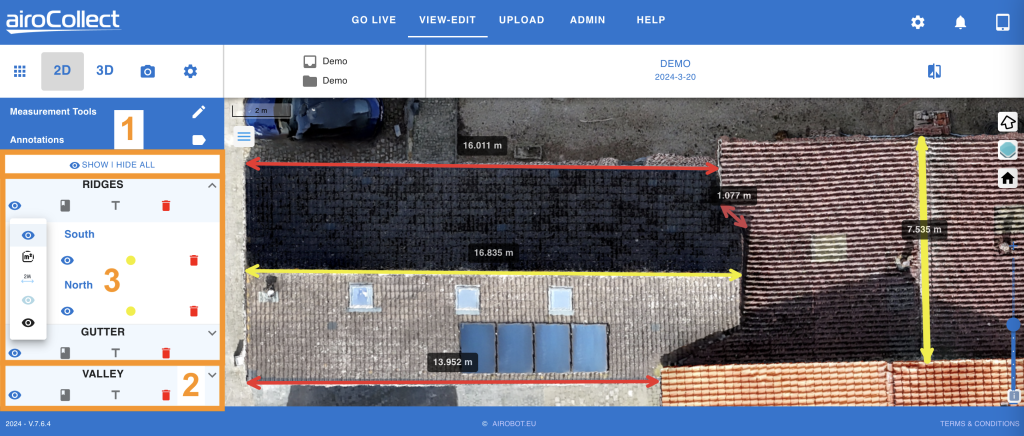
1. Show / Hide All
Click on show / hide all, to quickly toggle between visualizing all annotations or none.
2. Classification Layer
Show classification details
1. Click left on the arrow next to a classification title to open it.
Visualization of classification
1. Click left on the eye to see the classification visualization options:
– Dark Blue: Show All
– m2: Show lines and surfaces
– m: Show lines and distances
– Light Blue: Show lines only
– Black: Hide
Classification Label
1. Click left to show/hide the classification label on the ortho photo.
Measurement Label
1. Click left to show/hide the measurment label on the ortho photo.
Garbage Can
1. Click left and validate deletion of all measurements of 1 classification.
3. Classification Measurements
Edit the name
1. Click left on the pencil to edit
Change the view
1. Click left on the eye to change the way the measurement is visualized. Same as with the classification layer.
Change the classification
1. Click left on the colored dot to change the measurement classification.
Delete the measurement
1. Click left on the garbage can and validate to remove the measurement.
2D Reporting Tool
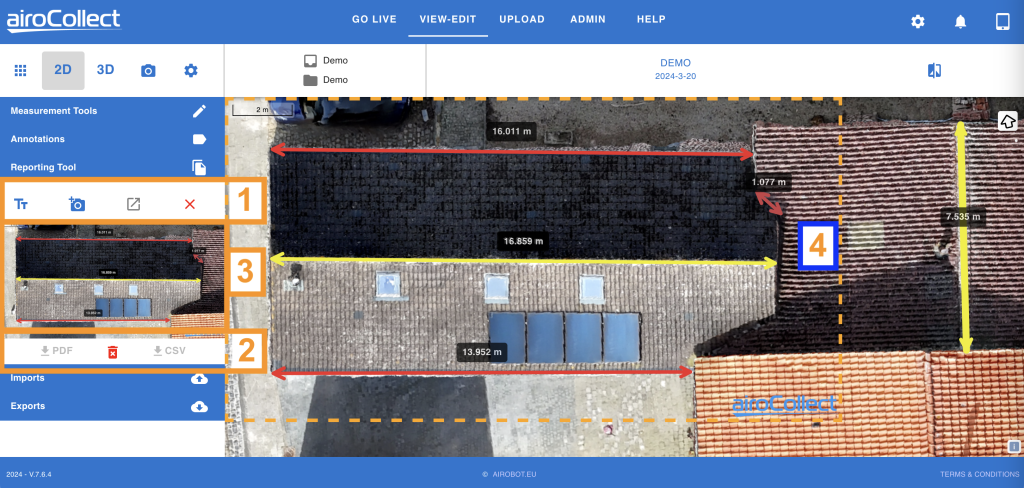
1. Create Functions
Tt
1. Click left to open a popup to add a generic text to each screenshot taken.
Camera
1. Click left on camera+ to get a dotted rectangle.
2. Move the image within the rectangle to get the right view.
3. Click left the second time to take the screenshot.
4. Press the cross right to cancel.
Generate Report
1. Click left on generate report to generate the report.
2. Download and Delete
Download PDF
1. Click left on the download pdf button to get the report.
Download CSV
1. Click left on the download csv button to get the measurements in sheet form
Garbage Can
1. Click left on a garbage can to delete the image in view.
3. Screenshots
Screenshots
Press the arrows, in case of multiple screenshots to show the screenshot taken.
View a thumbnail of the screenshot.
4. Screenshot Outline
1. The dotted line describes what will be placed as an image on the report.
2. With the dotted line active you can still zoom and rotate the ortho photo.
3. The goal is to get the best view of what you want to display to your client into this rectangle.
2D Imports & Exports
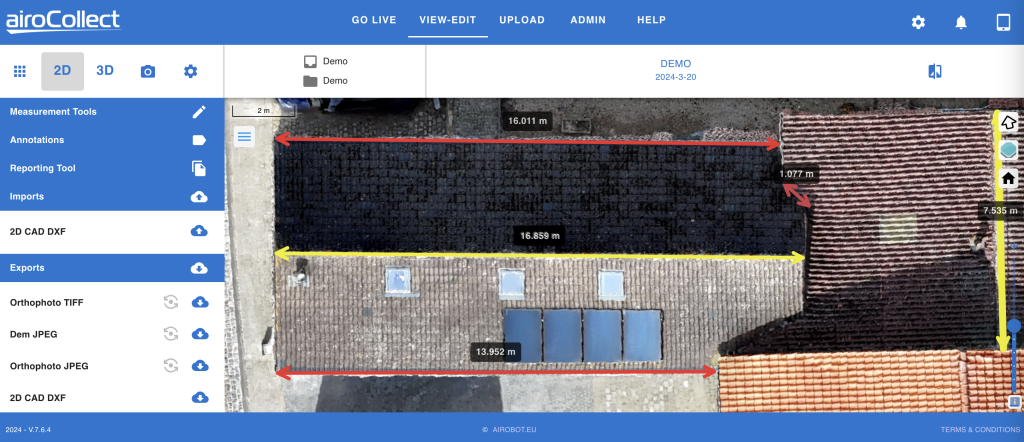
1. Imports
Upload a 2D georeferenced CAD file as an overlay of your ortho photo
2. Exports
1. The ortho photo in TIFF format including geo reference files.
2. The DEM (digital elevation model)
3. The ortho photo in JPG format including geo reference files.
4. The drawn measurements as lines into a DXF format.
3D Environment
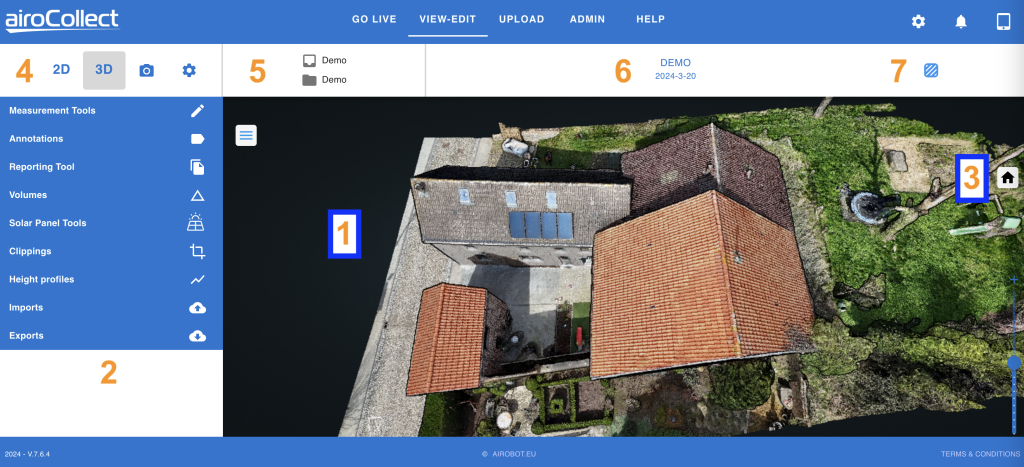
1. Navigation
(works also during measuring)
Translate (move up, down, left right)
1. Click followed by Click & Hold left mouse button
2. Drag the mouse pointer over the screen
3. Release to keep current position
Rotate (yaw the image to a new horizontal position)
1. Click & Hold left mouse button
2. Drag the mouse pointer over the screen to rotate
3. Release to keep current position
Zoom (enlarge or minify what you see)
1. Use mouse scroll up to zoom in
2. Use mouse scroll down to zoom out
2. Tools
There are multiple tools you can use in order to get useful information from the ortho photo. These are explained later:
- Measurement Tools: Take measurements
- Anotations: Show measurements taken
- Reporting Tool: Generate a PDF report
- Volumes: Do volume measurement
- Solar Panel Tools: Simulate solar panels.
- Clippings: Create point cloud cut-outs for export and visualisation
- Height Profiles: Generate height profile
- Imports: Import CAD Design
- Exports: DAE, LAS, OBJ, e57, DXF
3. Home
Home Point (go back to initial position)
1. Click the house icon
4. Mode
Dataset Selection
2D Environment
– View Ortho, Satellite image
3D Environment
– View the model in 3D
Images
– Review all uploaded images
Settings
– Here you can find the references of the scan
– Here you can find the links to the model to be shared online.
5. Name
a) Project Name
b) Item Name
6. Scans
Select and visualize the different scans made under this project and item.
7. Mesh
Go from a point cloud to a photorealistic image
3D Measurements
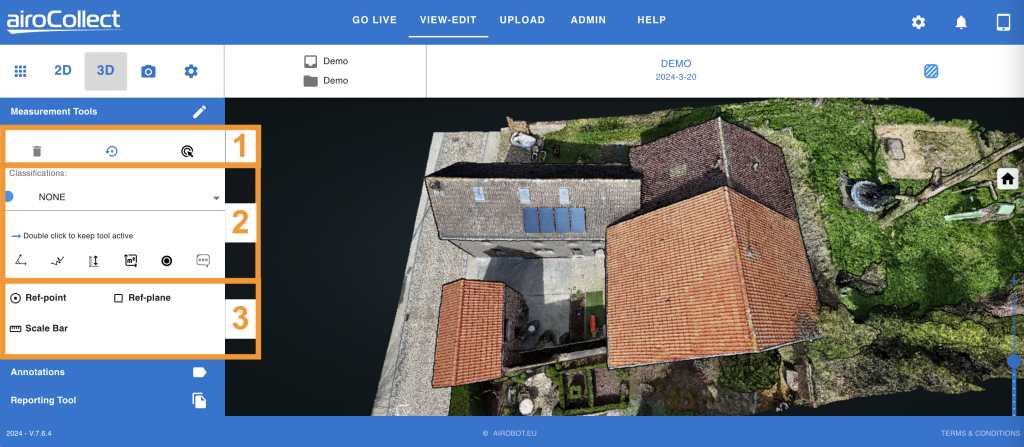
1. Screen State
Reset
Click left and validate to start over
Undo
Click left to reset last measurement taken
Delete
Activate a delete mode, clicking left on a measurement will delete it.
2. Measurement Tools
Choose a classification
1. Click left and select a label and color for the measurement you are going to take.
Names and colors can be edited under the “admin” section
Measurements taken under a classification will be grouped for edit and reporting aftwerwards.
Activate a measurement tool
1. Select the tool you want to use.
– Click left once to use the tool once
– Click left twice to use the tool continuously
Move over the ortho photo to start the measurement.
1. Based upon the classification chosen you have a colored dot connected to the mouse pointer.
2. Click left once to start a measurement.
3. Click left again for an intermediary point, if needed.
4. Click left twice to finish the measurement.
Your measurements can be found back under annotations below the classification chosen.
3. Reference Point, Plane & Scale
Add a reference point
1. Click left to activate reference point placing.
2. Click left to place a reference point in the 3D model.
3. All height points will be offset towards this reference point.
4. Height profiles are offset to this reference point.
Add a reference plane
1. Click left to activate reference plane placing.
2. Place 3 points on the 3D model, Click left to place a point.
3. Place points far apart and not in a line to have the best defined plane.
4. All height measurements well be taken orthogonal from the plane.
Add a reference measurement
1. Click left to activate reference measurement placing.
2. Place a reference measurement on the 3D model, 1 Click left to start, 2 Clicks left to end
3. Change the value to the desired value
4. All other measurements well be rectified with the reference measurement taken.
3D Annotations
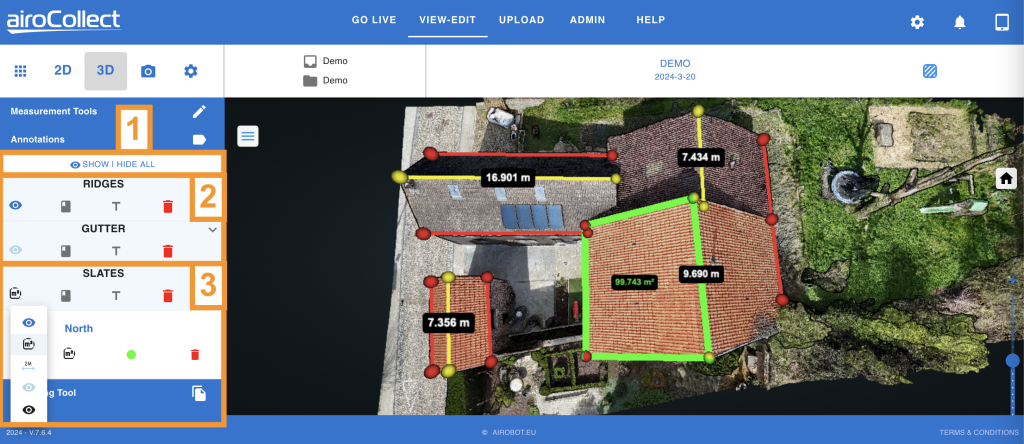
1. Show / Hide All
Click on show / hide all, to quickly toggle between visualizing all annotations or none.
2. Classification Layer
Show classification details
1. Click left on the arrow next to a classification title to open it.
Visualization of classification
1. Click left on the eye to see the classification visualization options:
– Dark Blue: Show All
– m2: Show lines and surfaces
– m: Show lines and distances
– Light Blue: Show lines only
– Black: Hide
Classification Label
1. Click left to show/hide the classification label on the 3D model.
Measurement Label
1. Click left to show/hide the measurment label on the 3D model.
Garbage Can
1. Click left and validate deletion of all measurements of 1 classification.
3. Classification Measurements
Edit the name
1. Click left on the pencil to edit
Change the view
1. Click left on the eye to change the way the measurement is visualized. Same as with the classification layer.
Change the classification
1. Click left on the colored dot to change the measurement classification.
Delete the measurement
1. Click left on the garbage can and validate to remove the measurement.
3D Reporting Tool
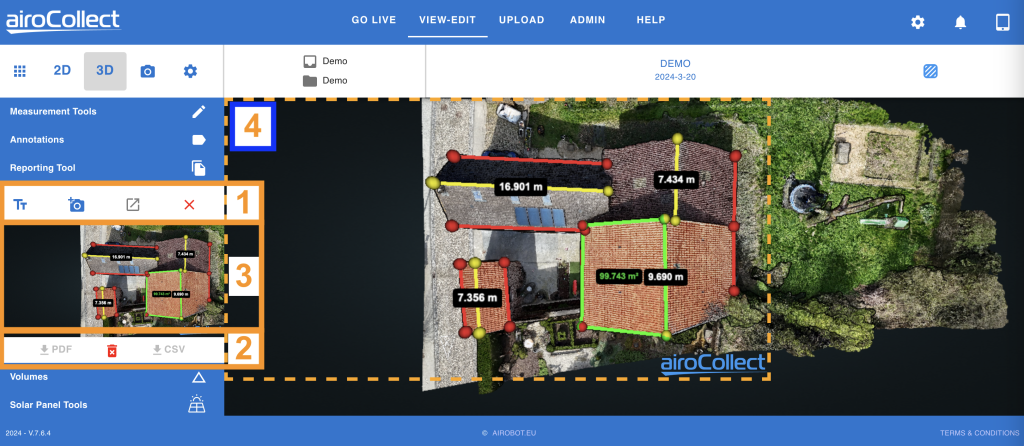
1. Create Functions
1. Tt –> Click left to open a popup to add a generic text to each screenshot taken.
2. Camera:
– Click left on camera+ to get a dotted rectangle.
– Move the image within the rectangle to get the right view.
– Click left the second time to take the screenshot.
– Press the cross right to cancel.
3. Generate Report
– Click left on generate report to generate the report.
2. Download and Delete
Download PDF
1. Click left on the download pdf button to get the report.
Download CSV
1. Click left on the download csv button to get the measurements in sheet form
Garbage Can
1. Click left on a garbage can to delete the image in view.
3. Screenshots
Screenshots
Press the arrows, in case of multiple screenshots to show the screenshot taken.
View a thumbnail of the screenshot.
4. Screenshot Outline
1. The dotted line describes what will be placed as an image on the report.
2. With the dotted line active you can still zoom and rotate the ortho photo.
3. The goal is to get the best view of what you want to display to your client into this rectangle.
3D Volumes
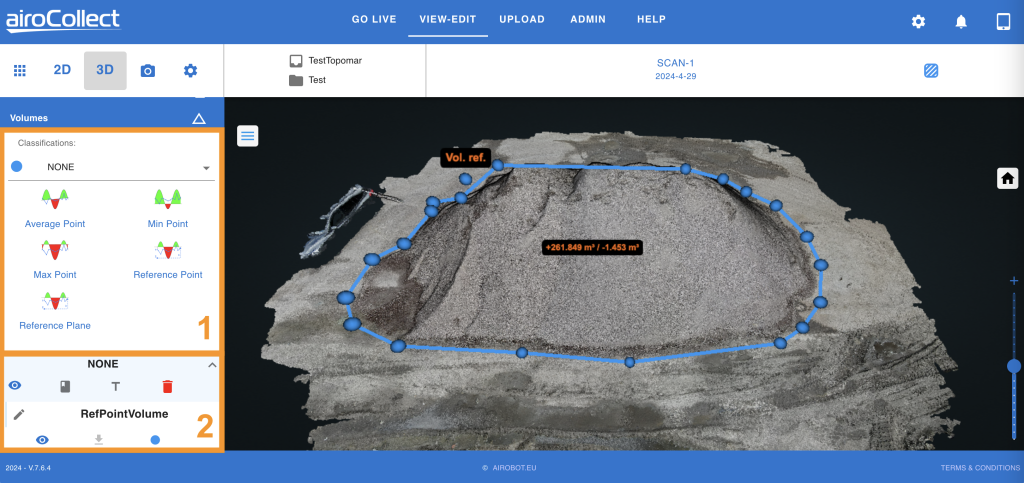
General
The volume tool can be used to measure heaps and wells.
Get the positive and negative volume, measured vertically above and below the surface :
– The surface can be defined from choosing out of the 5 options available.
– Once a contouring polygon has been defined it is projected vertically on this surface.
– The volume is the total volume from the surface to the first point found above or below.
– This vertically within the projected polygon boundary.
1. Tools
1. Click left on a volume icon to activate the option.
2. Go in the model and set out a polygon around the volume to measure.
3. In the model click left once to start the polygon and for each point.
4. Click left twice to finish the polygon.
5. Based upon the option chosen, a reference point or plane placement is next.
Average Point
The surface is the best approaching plane defined by the polygon placed.
Once the polygon is placed, the volume is calculated automatically.
Minimum Point
The surface is the horizontal plane through the lowest point of the polygon drawn.
Once the polygon is placed, the volume is calculated automatically from this lowest point reference.
Maximum Point
The surface is the horizontal plane through the highest point of the polygon drawn.
Once the polygon is placed, the volume is calculated automatically from this highest point reference.
Reference Point
The surface is the horizontal plane through a reference point manually placed on the model.
Once the polygon is placed, the volume is calculated after you have placed the reference point.
Reference Plane
The surface is the plane defined by you through placement of 3 reference points on the model.
Once the polygon is placed, the volume is calculated after you have placed the 3 points that define the reference plane.
2. Annotations
Show classification details
Click left on the arrow next to a classification title to open it.
Download volume point cloud
Click left on the download arrow in a volume to download it.
Visualization of the classification or measurement
Click left on the eye to see the classification visualization options:
– Dark Blue: Show All
– Light Blue: Show lines only
– Black: Hide
Change the measurement name
Click left on the pencil left of the measurement name
Classification or measurement Label
Click left to show/hide the classification label on the 3D model.
Garbage Can
Click left and validate deletion of all measurements of 1 classification.
3D Clippings
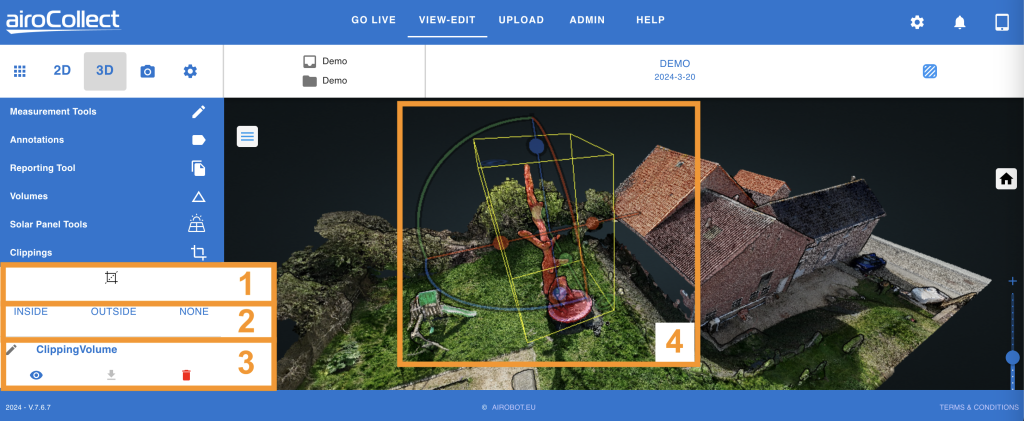
1. Create
1. Click left on the square icon to activate the clipping tool.
2. Move over the model to place the clipping box.
3. Click left to place the clipping box on the model.
4. Click left in the box to edit the box.
2. Mode
1. Select inside to only show what is inside the clipping.
2. Select outside to hide the clipping contents from the model.
3. Select none, to show the clipping as a different colored point cloud.
3. Annotations
Pencil
Click left on the pencil to change the clipping name.
Eye
Click left on the eye to change the clipping visualisation.
Download arrow
Click left to download the clipping as a point cloud.
Garbage can
Click left and confirm to delete te clipping.
4. Clip
Rotate
Click left and hold on a curved line. Swipe to rotate the box along that curved line.
Translate
Click left and hold on a straight line. Swipe to slide the box along that line.
Expand
Click left and hold on a bullet. Swipe to expand the box along that bullet line.
3D Height Profiles
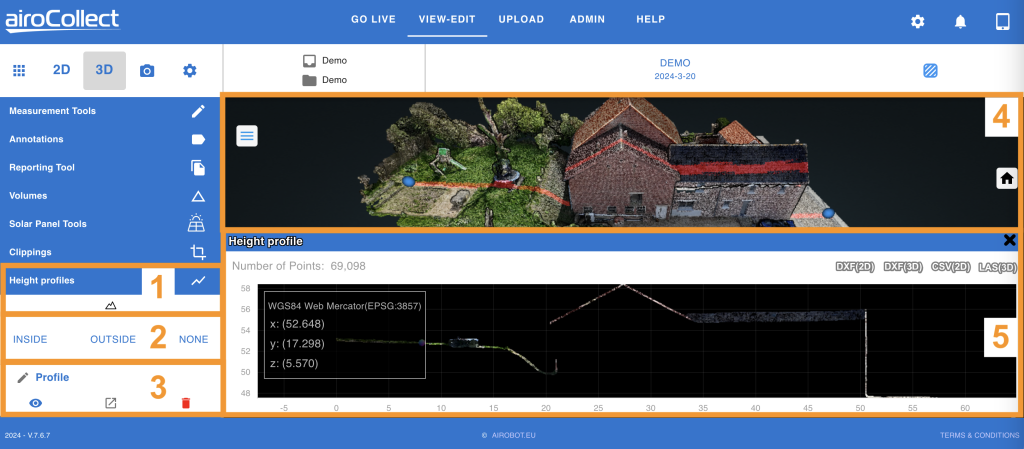
1. Create
1. Click left on the square icon to activate the clipping tool.
2. Move over the model to place the clipping box.
3. Click left to place the clipping box on the model.
4. Click left in the box to edit the box.
2. Mode
1. Select inside to only show what is inside the clipping.
2. Select outside to hide the clipping contents from the model.
3. Select none, to show the clipping as a different colored point cloud.
3. Annotations
Pencil
Click left on the pencil to change the clipping name.
Eye
Click left on the eye to change the clipping visualisation.
Download arrow
Click left to download the clipping as a point cloud.
Garbage can
Click left and confirm to delete te clipping.
4. Clip
Rotate
Click left and hold on a curved line. Swipe to rotate the box along that curved line.
Translate
Click left and hold on a straight line. Swipe to slide the box along that line.
Expand
Click left and hold on a bullet. Swipe to expand the box along that bullet line.
3D Imports & Exports
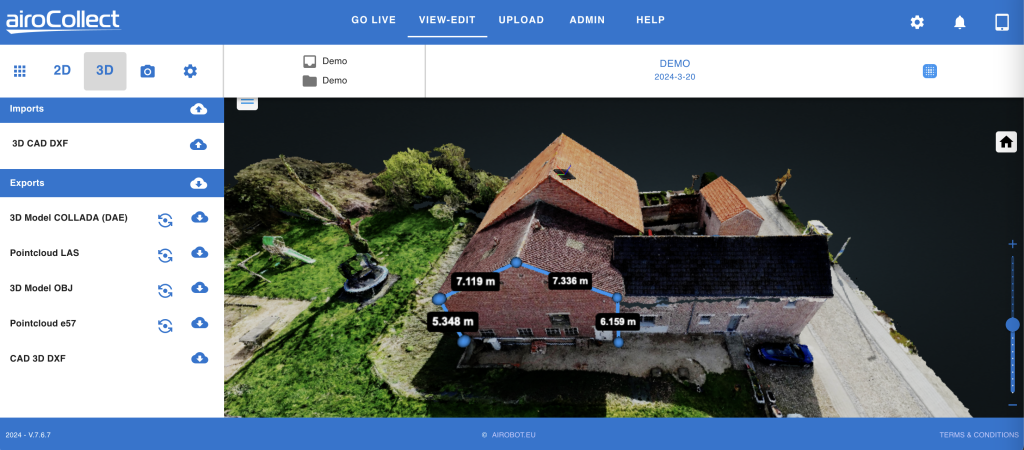
1. Imports
Upload a 3D georeferenced CAD file as an overlay of your point cloud model.
2. Exports
1. The 3D Model in DAE format for SketchUp.
2. The point cloud in LAS including geo reference.
3. The 3D model as points in OBJ.
4. The point cloud in e57.
5. The CAD 3D DXF of the measurements taken.
– This option only works if measurements are placed.
Solar
AiroCollect has following simulation options:
Solar Roof Simulation
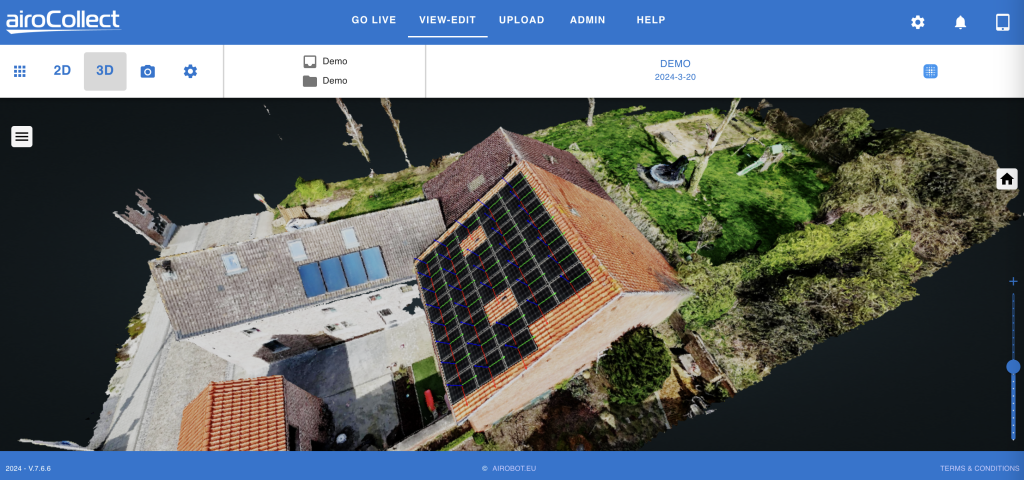
General
The solar tool can be used to quickly get an estimate about how many and where solar panels can be placed on a roof:
- Define panel size, yield (Watt/panel) and spacing parameters
- Select panel orientation, portrait or landscape
- Define panel type, for report color and work preparation
- Set up the surface on the roof where the panels should be placed or just place a few individual panels on the roof.
- Place a panel in that surface and auto multiply it to fill the entire roof
- Modify (rotate, slide) the entire panel set and remove individual panels where obstacles are shown.
- Get a result in the report of the solar installation and add realistic visualization for your client.
Define placement parameters
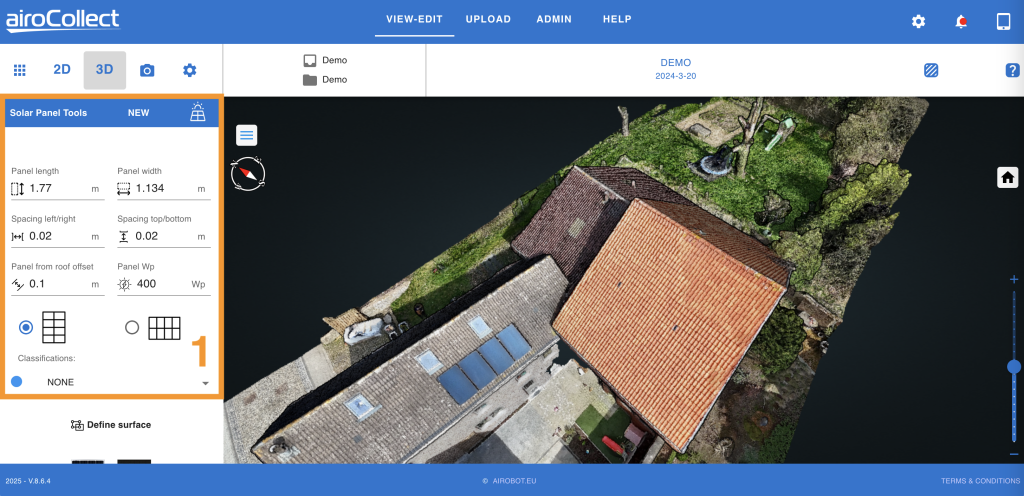
1. Parameters
- Adjust the Length and Width of the panels to be placed
- Define the spacing between panels
- Define the distance from the panels to the surface
- Give an indication of the panels peak power yield
- Set the default orientation of the panel (portrait or landscape)
- Choose a color and classification (ex. in case of more roofs to be outfitted)
Continue below to start panel placement.
Place a panel
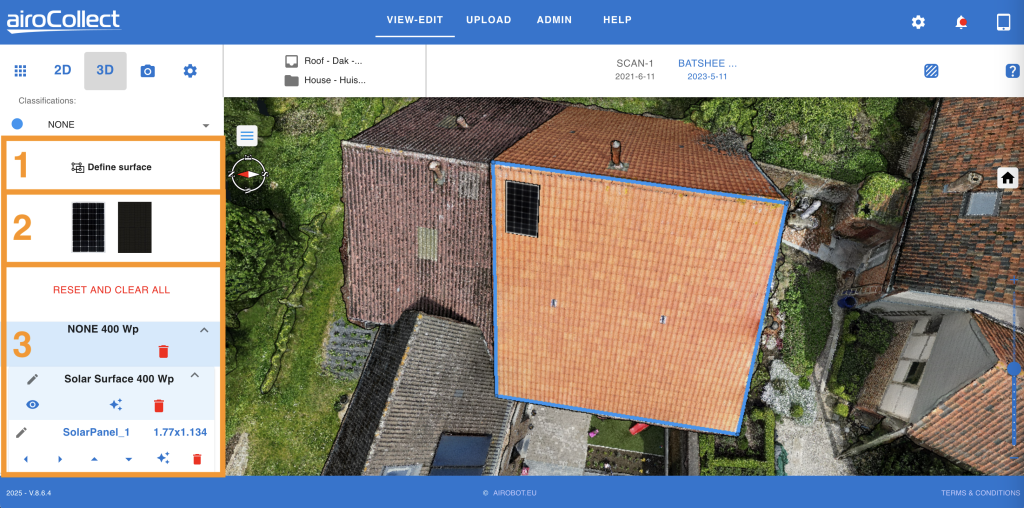
1. Define surface
You can place a few solar panels freely on the model or decide to place an array of solar panels in defined surface. To place a panel freely, do not define a surface, but just click (1x left) on a panel (2) and move the mouse over the 3D model, click (1x left) to anchor the panel anywhere on the model.
- To do panel placement in a predefined surface click left once on “Define surface” to start the area definition tool
- Go to the 3D model and draw a polygon on the roof surface you want to place panels on.
- Click left once to place the first point and keep clicking left to add points to define the extremities of the surface. Double click left to end the polygon.
- Once the surface has been defined, click left once on one of the 2 panel textures to place the first panel on the 3D model.
- Move the mouse within the defined polygon and select the start of the first row of solar panels to be placed.
- Once satisfied of its placement click left 1x to anchor the panel.
Click left on “Reset and clear all”, validate and start over.
2. Place the first panel
- Once the surface has been defined, click left once on one of the 2 panel textures to place the first panel on the 3D model.
- Move the mouse within the defined polygon and select the start of the first row of solar panels to be placed.
- Once satisfied of its placement click left 1x to anchor the panel.
- Click 1x left on the anchored panel, some arcs and lines will appear.
- Click and hold those lines to slide or rotate the panel, to better adjust it with the defined polygon.
Click left on “Reset and clear all”, validate and start over.
3. Fill in the surface
- Click left once on the magic icon in the solar surface header.
- Our software will try its best to fill in the complete area.
- If the area is not completely filled, click left on a panel on the edge. It will light up in the menu on the left side.
- With the arrows you can copy the panel in the direction you want to expand.
- Take the expanded panel and click on the magic button again, to fill out the area further.
- Each individual panel can now be rotated and slid into the direction and orientation you need.
Click left on “Reset and clear all”, validate and start over.
Move all panels and delete those that are being obstructed
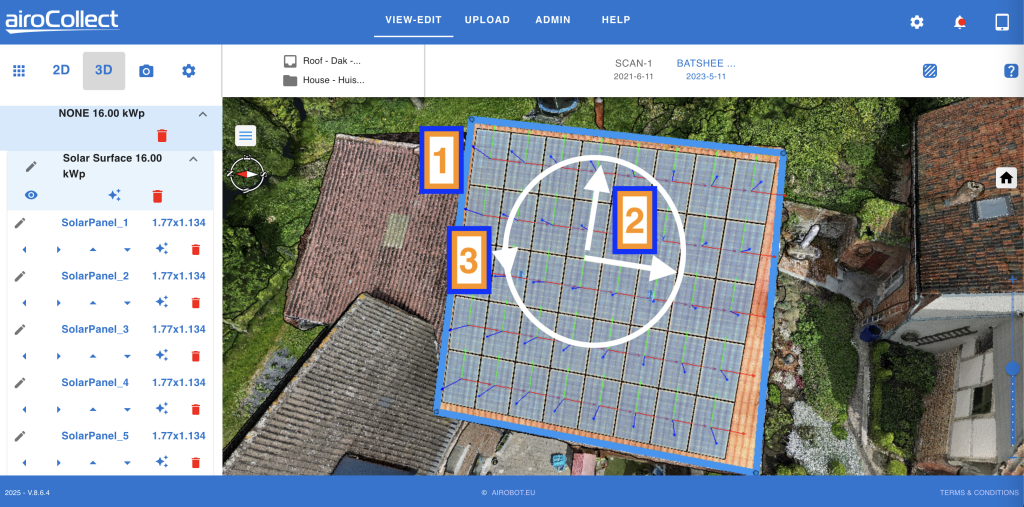
1. Select the full panel set and delete the unwanted ones
- Click left once on the polygon.
- All panels go from normal to fully transparant.
- Zoom in into the panels to see if there are chimneys or other items on the roof that would prevent panel placement.
- Click left on the panel to select and remove it from the list on the left side. Upon click the list will highlight the selected panel.
- Click on the polygon again to make the full panel set translucent again.
2. Move the entire set in a linear way
- Use the arrows on the keyboard to move the entire panel set.
- Tab the left and right arrow keys to move horizontal in small steps within the defined surface.
- Tab the up and down arrow keys to move vertical in small steps within the defined surface.
3. Rotate the entire set in circular way
- Use and hold the SHIFT key down + tab the arrows on the keyboard to rotate the entire panel set around its central point.
- Tab the Left and Right keys while holding the SHIFT key to rotate with a few degrees in each direction.
- Try to rotate the panels in such a way that the lines of the panels match the roof tiles.
Create an image for the report
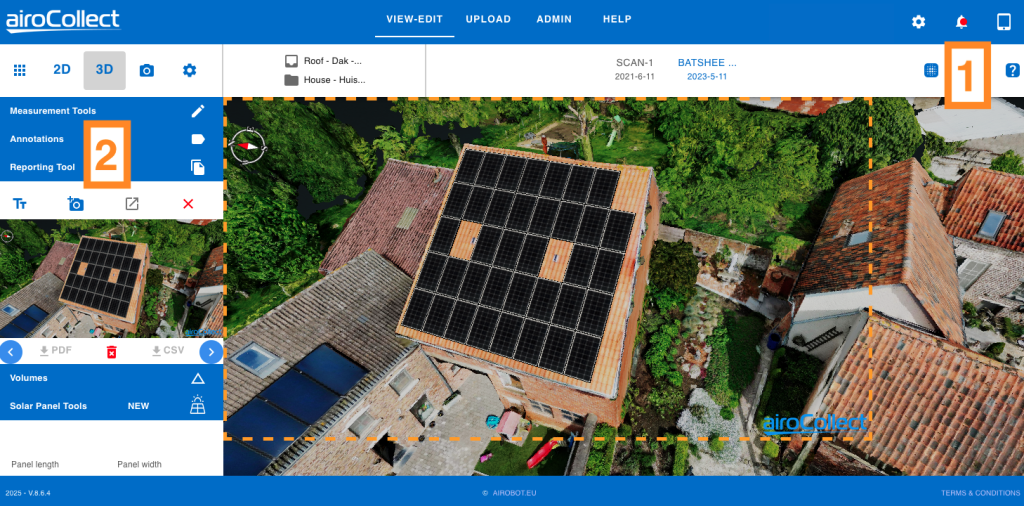
1. Photo realistic mode
- The 3D model can be displaced in a point cloud (3D points) view or a photo realistic mesh representation (3D textures).
- Click left 1x on the icon to switch between both view modes.
2. Create an image of how the result will look
- Open the “Reporting Tool” menu (1x left click)
- Orientate the 3D view in such a way it represents well the result for the client.
- Press the camera+ icon to activate the oranje dotted line to lay out the snapshot to be taken.
- Press the camera+ icon again to take the snapshot.
Use the 2D to get the azimuth and a laying plan
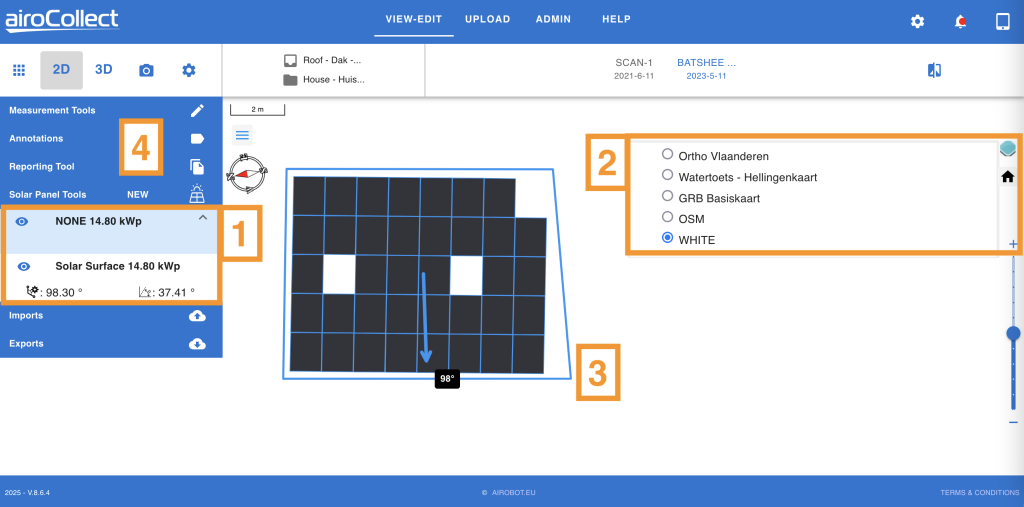
1. Go to 2D and press Solar Panel Tools
- Here you will find all the solar panel surfaces you have defined.
- Per panel group you get the azimuth from south and angle.
2. Change the layout of the 2D image
- Press the layer icon to modify what is shown.
- Uncheck the ortho photo to hide the satellite image.
- Check WHITE to have a white background.
3. Change the viewport for the report
- Hold the SHIFT button and left click and hold the mouse button to rotate the image while moving the mouse.
- Use the scroll button to have the right zoom level.
4. Add the layout plan to the report
- Open the reporting tool menu.
- Click left 1x on the camera+ icon to get an outline of the image to add to the report.
- Click left 1x on the camera+ icon to add the selected outline as an image to the report.
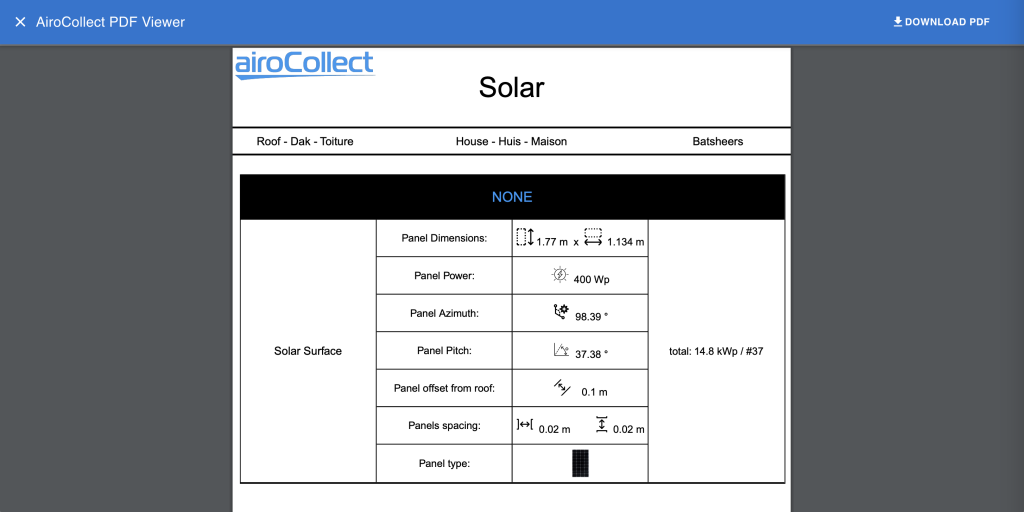
Generate the report to get all the information of the solar installation
Design
Import into CAD

Import in Sketch up 2022

From minute 27


Admin
Within AiroCollect you have the opportunity to configure the way the application works.
Overview
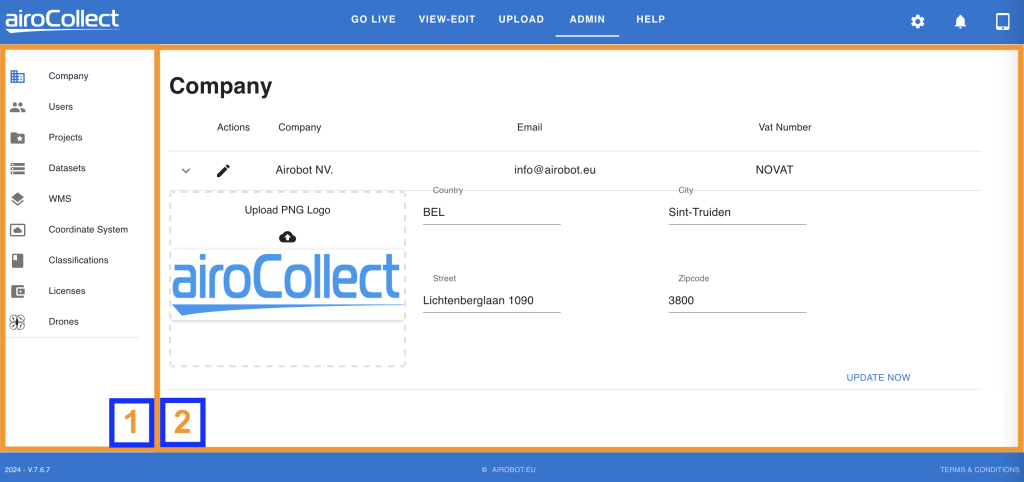
1. Menu
Company
Modify company name, V.A.T. number, logo and address.
Those will be used on the report of each scan.
Users
Add, modify and delete users.
Give users program access:
– View: see projects
– View-Edit: see and modify projects
– Upload: Create new projects
– Admin: manage the admin page and have full access.
Give users data access:
– All or a set of projects
– All or a set of items
– All or a set of datasets
Projects
– Manage name, description and location data.
– Delete if necessary.
Datasets
– List of all datasets with option to delete.
Web Map Service (WMS)
– Add self-hosted or online hosted WMS services to the ortho photo (2D) overview.
– Be able to compare your model with items of the real world.
Coordinate System
Define the coordinate systems in which real world data should be handled.
– Set the standard for non-RTK and RTK coordinates on drone images
– Set the standard for all geodata exports.
Modify the measure world between METRIC and IMPERIAL.
Classifications
Define the labels of the colors used during measurement.
Adjust them to what fits your business.
Licenses
Get an overview of your AiroCollect license.
Drones
Get insight in the connected drones to be used with AiroCollect live.
2. Edit
Modify the items chosen from the menu.
License
The AiroCollect license is a single license.
You are either in a limited system (SMALL, MEDIUM) or in an unlimited system (UNLIMITED). You pay this license either on a monthly or annual basis.
Based upon the formula that best suits you, you can always change between licenses.
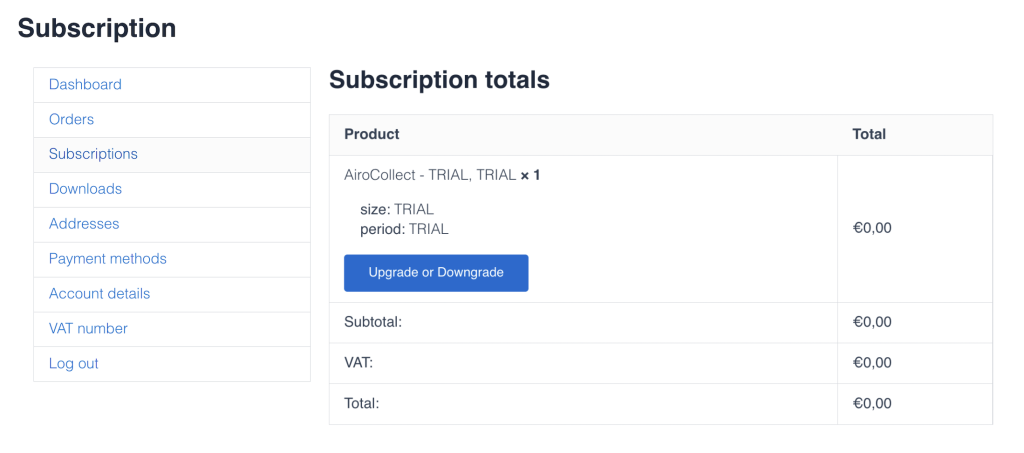
A) To modify your subscription surf to subscriptions.
1. Login into your account.
2. Click on subscriptions to view what you have running with us.
3. Click on the subscription you want to change.
4. Press “Upgrade or Downgrade” to change your license.
B) Following modifications are possible: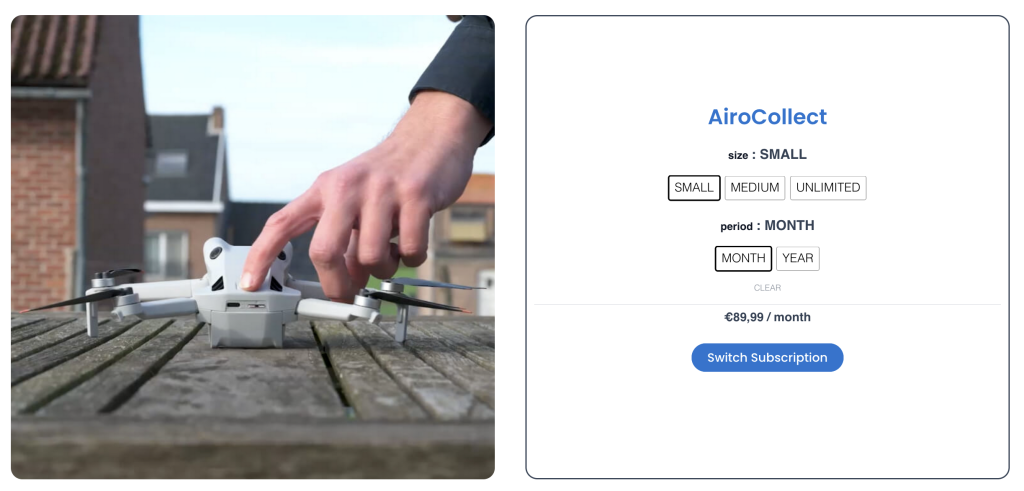
Based upon the option chosen, your license will be adapted automatically to a new subscription.
A) To top up your subscription surf to subscriptions.
1. Login into your account.
2. Click on subscriptions to view what you have running with us.
3. Click on the subscription you want to change.
4. Press “Upgrade or Downgrade” to change your license.

B) Following modifications are possible:
Based upon the option chosen, your license will be adapted automatically to a new subscription.
Payment
Payment can be done directly on orders or managed in general.
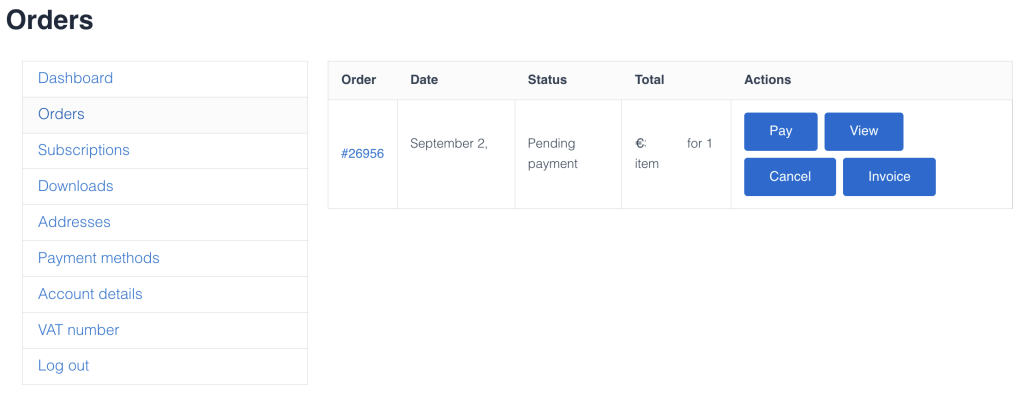
A) Order payment, surf to orders (click on the link).
- Login into your account
- Click on “Orders” to see your order history
- Click on “Pay” to fulfill the order
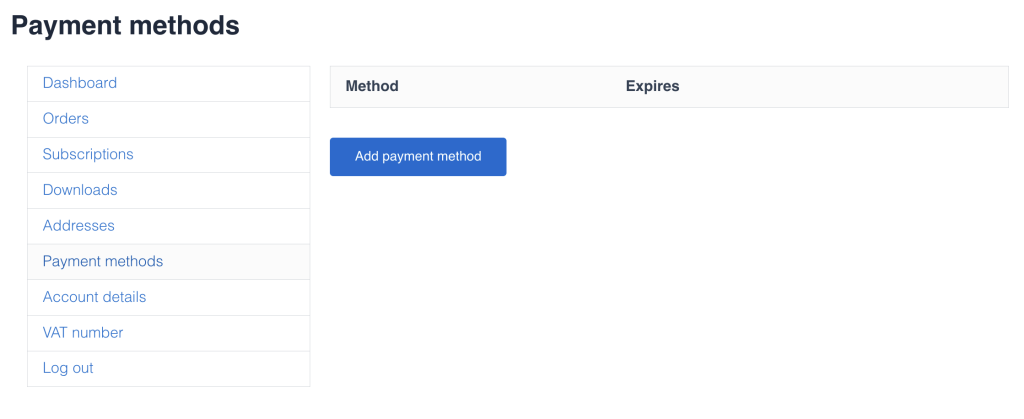
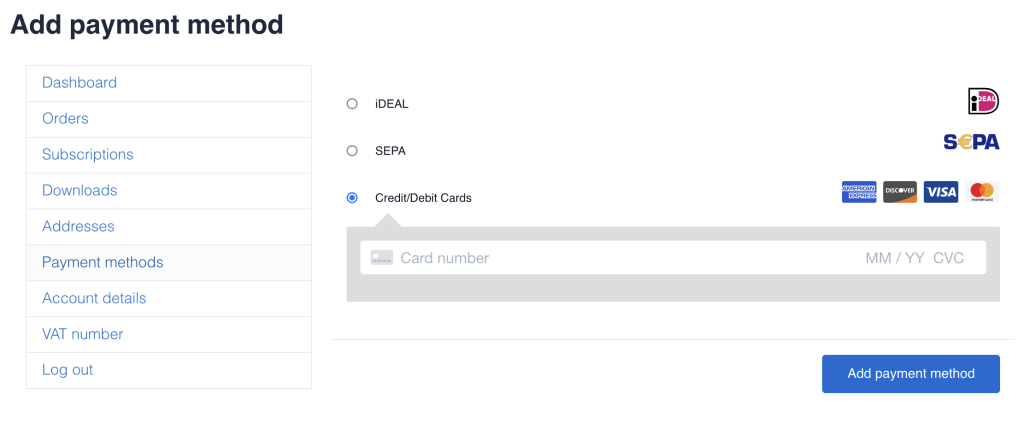
B) Payment method add or change, go to payment-methods (click on the link).
- Login into your account
- Click on “Payment methods” to see your settings
- Click on “Add payment method” to manage
Invoice
To retrieve your invoice surf to orders.

- Login into your account
- Click on “Orders” to see your order history
- Click on invoice from the order you want to get your invoice
Download
Click the icon above to directly install or link to the application.
WARNING: Only works for remote controller with android smartphone!
Buy from DJI: DJI STORE
For MINI-1,2 and 3 or 4 go to airocollect.com/android for installation instructions and release notes.
For I-Phone go to airocollect.com/dji for instructions how to fly automated.
The applications are made to make scanning an area with a drone easy!
They are all free of charge.
(other DJI drones can work too but are not supported)
- MINI-1 + MINI-1 SE
- MINI-2 (not MINI-2 SE ; not MINI-4K)
- MINI-3 + MINI-3 PRO
- MINI-4 + MINI-4 PRO
(other android devices can work too but are not supported)
- Android 10-11-12-13-14
- Compatible with: Samsung Galaxy S24 Ultra, Samsung Galaxy S23 Ultra, Samsung Galaxy S22 Ultra, Samsung Galaxy S21 Ultra, Samsung Galaxy Note 20 Ultra, Samsung Galaxy A54, Samsung Galaxy A53, HUAWEI Mate X5, HUAWEI Mate 70 Pro, HUAWEI Mate 70, HUAWEI Mate 60 Pro, HUAWEI Mate 60, HUAWEI Mate 50 Pro, HUAWEI Pura 70 pro+, HUAWEI Pura 70 pro, HUAWEI Pura 70, HUAWEI P60 pro, HUAWEI P50 pro, Xiaomi 15 Pro, Xiaomi 14 Pro, Xiaomi 13 Ultra, Xiaomi 12 Ultra, Xiaomi 11 Ultra, Xiaomi MIX 4, Xiaomi POCO X5 Pro, Redmi Note 12 Pro, Redmi Note 11 Pro, Redmi K60 Pro, Redmi 12C, HUAWEI nova11 Pro, Honor 90 Pro, OPPO Reno 10 Pro, VIVO X200 Pro, VIVO X100 Pro, VIVO S17 Pro, VIVO Y78+, iQOO neo8, OnePlus Nord CE 3, Pixel 9 Pro, Pixel 8 Pro, Motorola G24, Motorola G32.
Tips & Tricks
Here we provide feedback on how to optimize your process. Depending on what you want to retrieve from a scan the quality of result sometimes resides in the details of operation.
Below you can find some questions we have received:
The model has no facades
The reason facades are sometimes not visible is due to the lack of images taken.
The upload fails
When adding your images into AiroCollect, best practices are:
- Have a stable internet connection.
- Upload the images from the harddisk from your computer not from the drone.
- Do not close the upload window of your browser screen.
- Do not let the computer go into sleep mode.
If one of the above is not present, please try again correcting the above.
Measurements are not accurate
Skewed surfaces
If you need to measure skewed surfaces be sure you are working in the 3D environment. The 2D environment is only useful for measuring perfectly horizontal planes.
The scan did not follow a standard method of flying
– only a few images
– different gimbal angles during the scan
– images taken at different heights
– flights at different times during the day
It is recommendable to use the “Scale Bar” to set a known reference measurement.
The android app does not connect with the drone
- Is the drone and remote control ON?
- Have you removed another app like DJI that could also connect to the drone from memory?
- Have you installed the right app for your drone?
- Is your phone compatible with the android application?
I cannot draw a mission plan
1. Does the drone have a GPS position?
The drone will not take off
- Does your drone have GPS position?
- Is the battery of your drone and remote sufficiently charged?
- Does your drone require some sort of calibration (compas, IMU)?
- Has your drone the latest firmware installed?


